Showing posts with label waste. Show all posts
Showing posts with label waste. Show all posts
Thursday, June 1, 2017
Cara Membersihkan Waste Ink Pad Epson L110
Cara Membersihkan Waste Ink Pad Epson L110
Setiap printer sudah pasti memiliki yang namanya waste ink pad, gunanya itu untuk menampung tinta yang tidak terpakai atau terbuang khususnya saat printer melakukan head cleaning. Itu artinya suatu saat nanti wadah tersebut akan penuh, dan biasanya jika hal itu sudah terjadi, maka printer akan memberikan suatu peringatan blinking, nah... Inilah kadang orang banyak salah kaprah, ada yang mengatakan error tersebut suatu kerusakan padahal menurut saya tidak, printer justru memberitahukan kepada anda bahwa Waste Ink Pad harus di kosonkan ulang karena sudah penuh,.
Dengan catatan sebelumnya harus direset dulu, kalau belum tahu caranya anda bisa lihat di sini Cara Reset Waste Ink Is Full Epson L110,L300,L350,L355. Jadi harus di reset terlebih dahulu karena printer itu mendeteksi waste ink full berdasarkan kuantity tinta yang tertampung melainkan berdasarkan perhitungan pencetakan dan cleaning yang terjadi, itu artinya anda tetap tidak akan pernah bisa menggunakan printer anda meskipun anda telah membersihkan atau menggantinya dengan yang baru.
oleh karena itu kali ini kita akan coba untuk fokus membahas mengenai bagaimana caranya membersihkan waste ink tersebut karena kalau tidak akan beresiko terhadap printer anda, mengapa? Bayangkan saja sendiri jika tinta tersebut meluber kemana-mana. Itu akan memicu kosleting.. Nah membersihkannya itu sangat mudah disini saya gunakan printer epson l110 dari salah satu pelanggan saya, haha, jika anda juga termasuk pengguna epson L110 ikuti saja cara di bawah ini.. Caranya
1. Cari baut dan lepas, perhatikan di bawah
Dengan catatan sebelumnya harus direset dulu, kalau belum tahu caranya anda bisa lihat di sini Cara Reset Waste Ink Is Full Epson L110,L300,L350,L355. Jadi harus di reset terlebih dahulu karena printer itu mendeteksi waste ink full berdasarkan kuantity tinta yang tertampung melainkan berdasarkan perhitungan pencetakan dan cleaning yang terjadi, itu artinya anda tetap tidak akan pernah bisa menggunakan printer anda meskipun anda telah membersihkan atau menggantinya dengan yang baru.
oleh karena itu kali ini kita akan coba untuk fokus membahas mengenai bagaimana caranya membersihkan waste ink tersebut karena kalau tidak akan beresiko terhadap printer anda, mengapa? Bayangkan saja sendiri jika tinta tersebut meluber kemana-mana. Itu akan memicu kosleting.. Nah membersihkannya itu sangat mudah disini saya gunakan printer epson l110 dari salah satu pelanggan saya, haha, jika anda juga termasuk pengguna epson L110 ikuti saja cara di bawah ini.. Caranya
1. Cari baut dan lepas, perhatikan di bawah
 |
| Lepaskan Baut |
letaknya itu ada pada bagian belakang.
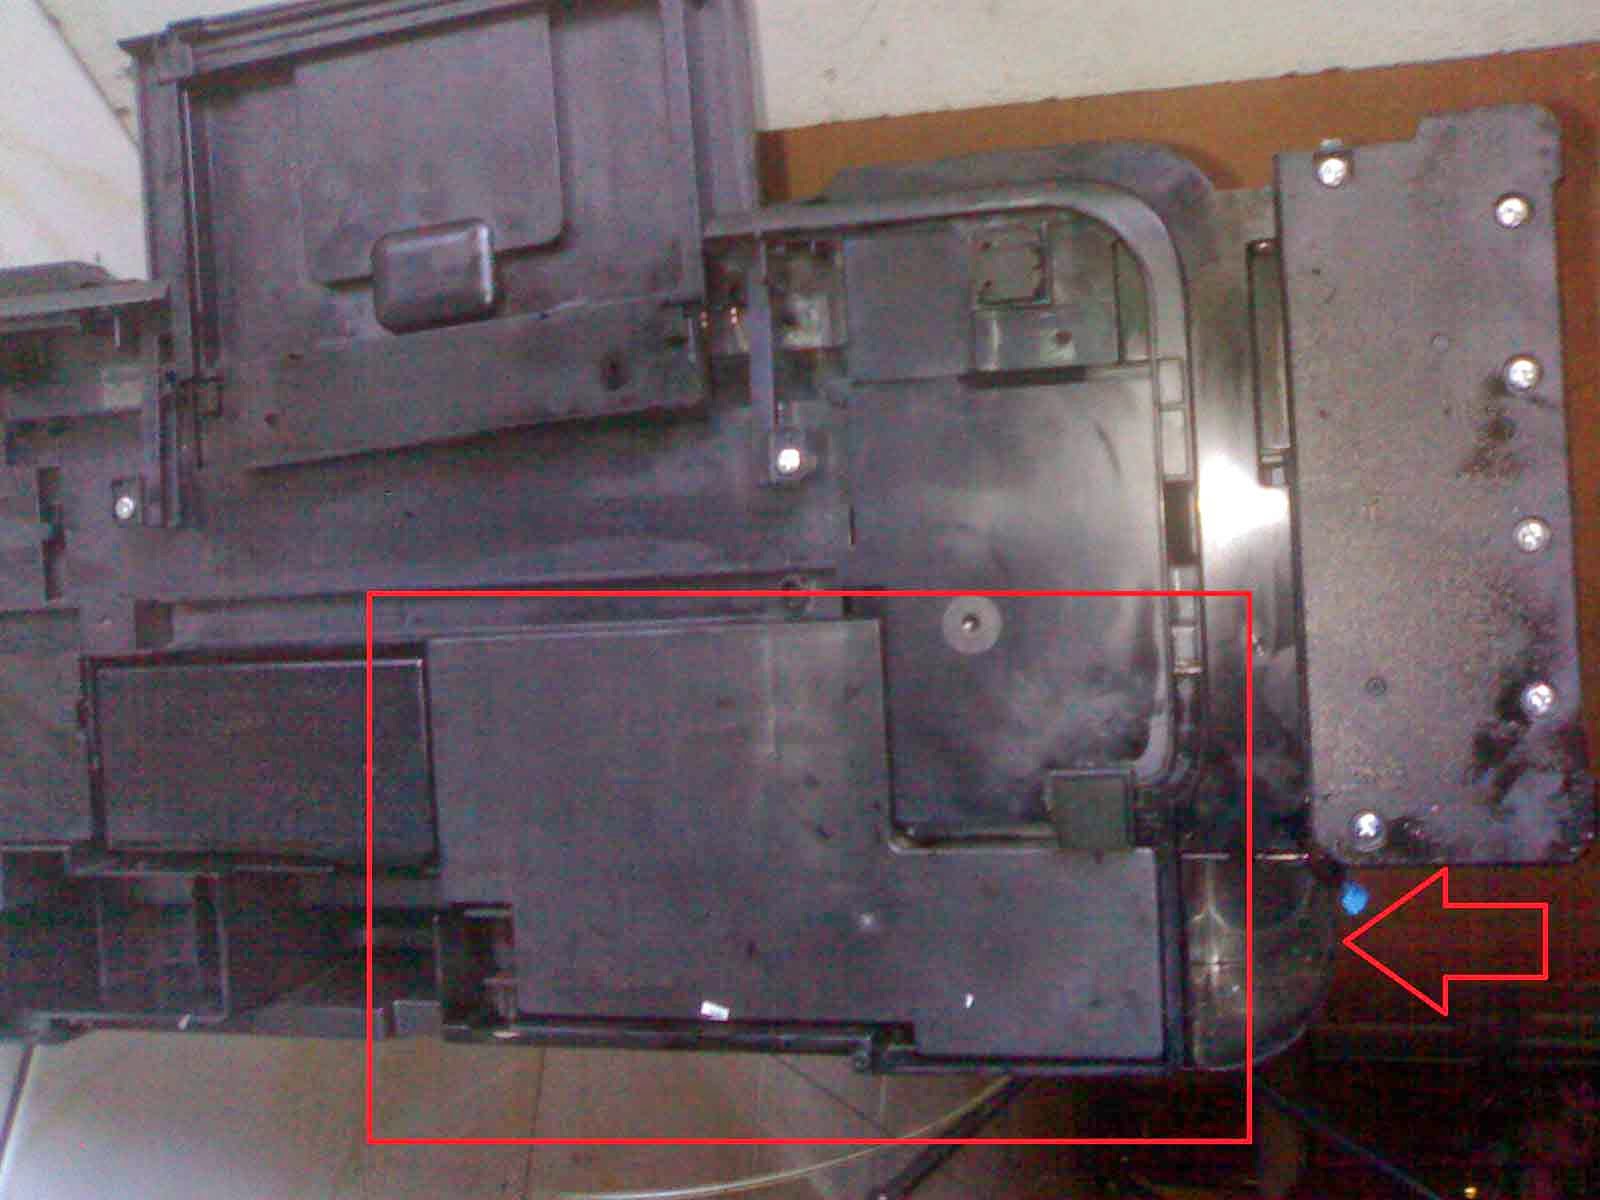
2. Kemudian balikkan printer anda, lihat gambar printer dibawah..
 |
| Perhatikan Lokasi Waste Ink |
nah yang saya tandai di atas itu adalah lokasi waste ink padnya.
3. Geser ke bawah. Kemudian cabut waste ink tersebut keluar dari dudukan.. Jadinya seperti ini
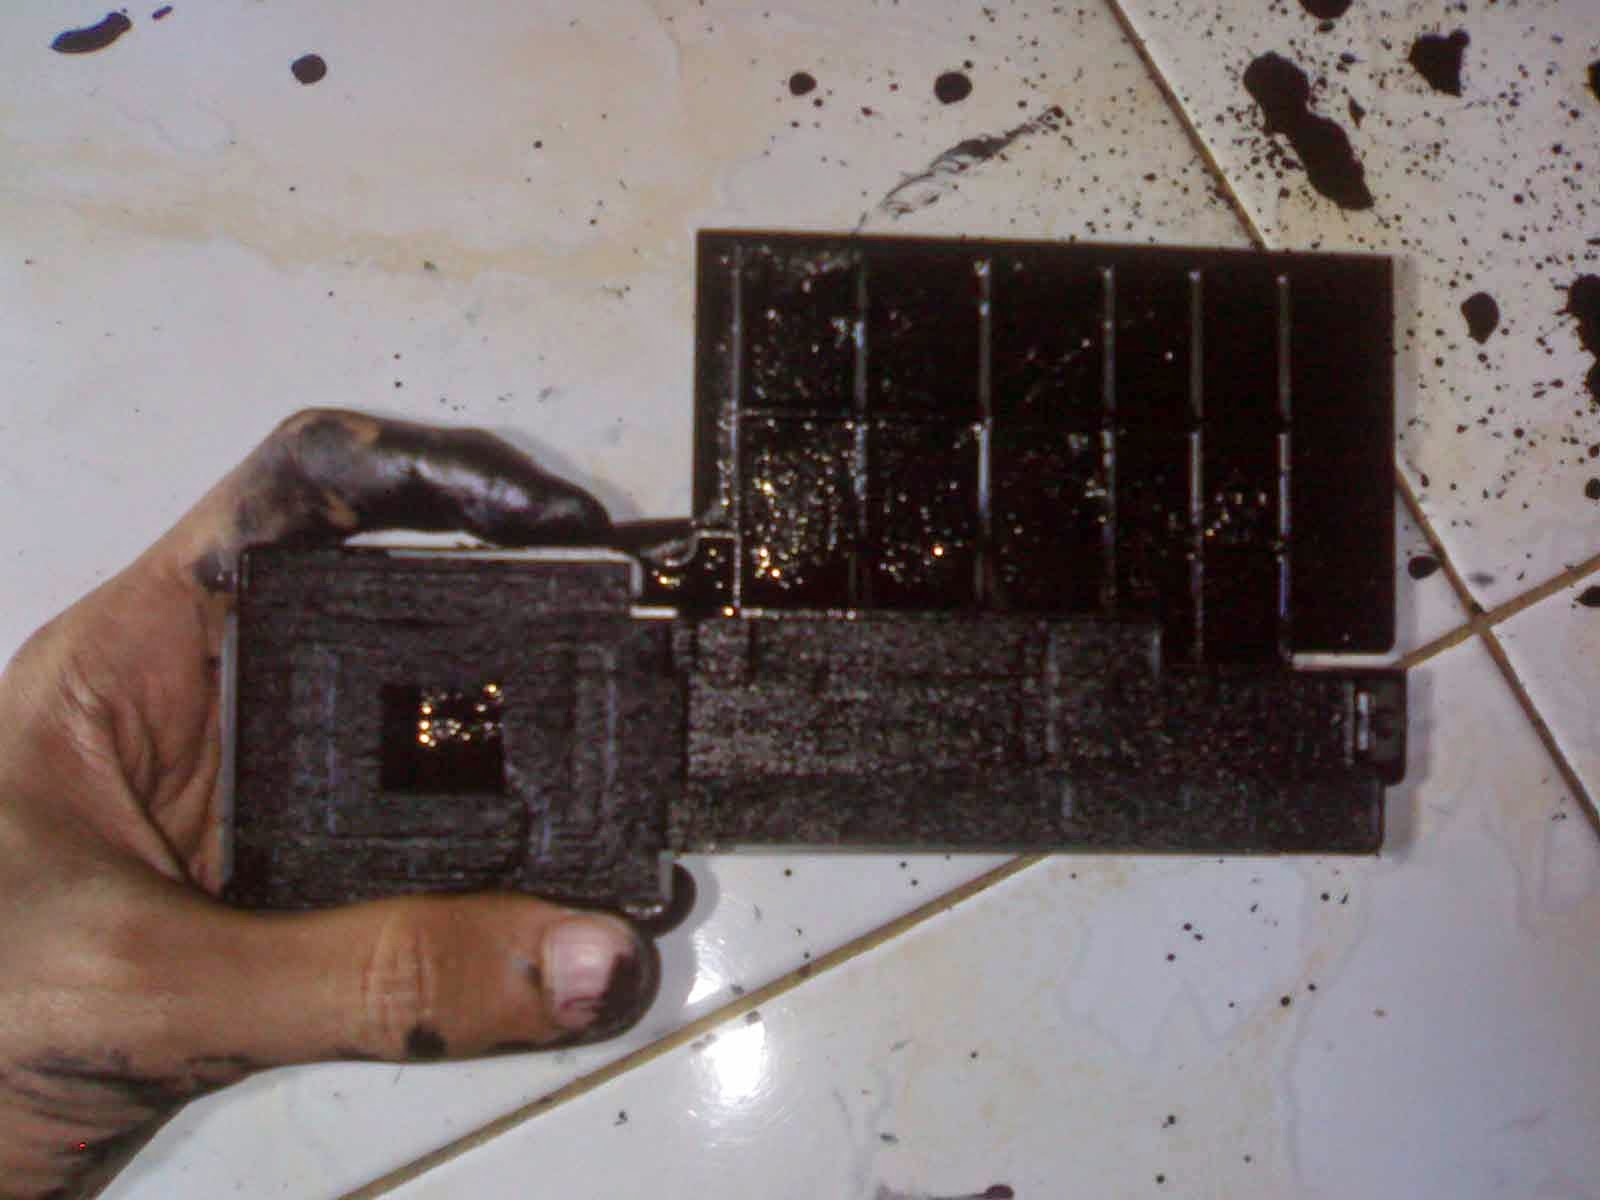 |
| Gambar Waste Ink Pad Epson L110 |
sampai disini anda harus siap-siap saja menerima kenyataan tangan anda jadi belepotan.. Hahay
4. Selanjutnya. Silahkan anda bersihkan waste ink tadi, caranya lepas seluruh tissue waste ink, kemudian cuci dengan menggunakan air sapai betul-betul bersih,. tapi anda harus hati-hati karena tisue tersebut terbuat dari bahan yang lunak, jangan sampai sobek..
 |
| Proses Perncucian Waste Ink |
gambar diatas saya ambil saat proses pencucian, jadi maaf kalo tampilannya agak sangar.. Haha
5. Setelah sudah bersih. Jemur sampai waste ink betul-betul kering..
6. Untuk tahap akhir anda tinggal memasang kembali seperti posisi semula...
Go to link Download

Tuesday, April 18, 2017
canon waste tank reset for canon i70
canon waste tank reset for canon i70
Below is a procedure that in most cases should resolve a Canon i70 waste tank issue
1) Close the print head cover, and turn off the printer. While pressing the Resume/Cancel button, press the Power button.
(Do not release the buttons. The LED lights in green to indicate that a function is selectable.)
2) While holding the Power button, release the Resume/Cancel button.
(Do not release the Power button.)
3) While holding the Power button, press the Resume/Cancel button 3 times, and then release the Power and Resume/Cancel buttons.
(Each time the Resume/Cancel button is pressed, the LED lights alternately in either orange or green, starting with orange.)
During initialization, the LED blinks in green.
4) When the LED stops blinking and lights in green, press the Resume/Cancel button 4 times (Each time the Resume/Cancel button is pressed, the LED lights alternately in either orange or green, starting with orange.)
After the function (menu) is selected, press the Power button. The LED lights in green, and the selected function is performed. (When the operation completes, the printer returns to the menu selection mode automatically.)
*** 4 times Green Waste ink counter resetting Both the main and borderless print waste ink counters are cleared.
Driver Canon i70 :Download
Go to link Download
Friday, March 31, 2017
Cara Reset Waste Ink Counter Canon MP145 MP150 dan MP160
Cara Reset Waste Ink Counter Canon MP145 MP150 dan MP160
Cara Reset Waste Ink Counter Canon MP145, MP150, dan MP160 akan saya jelaskan di sini. Printer Canon MP145, MP150, dan MP160 yang perlu direset akan muncul tanda-tanda berikut : yaitu di LED 7 segmen akan tampil Error Code E8 atau E27.

Bagi temen-temen yang printer Canon MP145, MP150, dan MP160 -nya mengalami kejadian tersebut, berikut cara resetnya :
1. Matikan printer (pastikan kabel power masih terpasang), tekan dan tahan tombol STOP/RESET, kemudian tekan dan tahan tombol ON/OFF dan lepas STOP/RESET (tombol ON/OFF jangan dilepas, kemudian tekan tombol STOP/RESET 2x
2. Lepaskan kedua tombol bersamaan, dan sekarang printer dalam posisi SERVICE MODE (pada LCD printer akan muncul angka "0")
3. Setelah lampu on/off berwarna hijau dan lampu LCD muncul angka 0, silahkan tekan tombol STOP/RESET sesuai dengan petunjuk berikut:
di tekan 1x = lampu Orange nyala >untuk Service pattern testprint
di tekan 2x = lampu Hijau nyala >untuk EEPROM testprint
di tekan 3x = lampu Orange nyala >untuk EEPROM reset
di tekan 4x = Lampu Hijau Nyala >untuk Waste ink counter reset
Kalau Canon MP145, MP150, dan MP160 errornya E27, maka pilihlah 4x tekan tombol STOP/RESET.
4. Tekan tombol ON/OFF 2x, maka printer akan mati, dan cabut kabel POWER.
5. Pasang kembali kabel Power dan Hidupkan kembali printer anda. Selesai...
Selamat mencoba.........
Go to link Download
Tuesday, March 21, 2017
Cara Mudah Reset Ink Waste Is Full Printer Epson L110 L300 L350 L355
Cara Mudah Reset Ink Waste Is Full Printer Epson L110 L300 L350 L355
Pernahkan kalian ketika mau ngeprint tiba - tiba muncul tulisan " Ink Waste Is Full " ?
“Mengapa Printer memberikan informasi seperti itu, padahal saya telah memasang selang pembuangan eksternal Pada Printer saya??” ,, Mungkin seperti itulah anda bertanya-tanya di dalam hati,, memang benar!! dan tidak mungkin tempat Pembuangan yang ada di dalam Printer menjadi penuh karena sudah disiapkan pada bagian luar printer, akan tetapi Meskipun anda telah memasang Pembuangan Eksternal, anda tetap akan menemukan Ink Waste Is Full pada Printer anda Mengapa?? Hal ini disebabkan karena Printer pada dasarnya tidak mendeteksi Full atau tidaknya Pembuangan yang pada pada Printer,, melainkan Printer hanya Menghitung berapa besar aktifitas Pencetakan yang pernah anda lakukan selama ini, dan sudah berapa besar tinta yang telah di buang atau di Cleaning oleh printer.
Berikut langkah cara mereset printer epson L110, L300, L350 Dan L355
- Jadi Printer mengidentifikasi hal tersebut berdasarkan Pemakaian Bukan Berdasarkan Ful atau tidaknya Ink Waste Tersebut, Sudah Paham?? Bukan, Nah!!, Jika anda menemukan kondisi seperti yang saya jelaskan di atas, dalam hal ini adalah Ink Waste Is Full maka silahkan anda mengikuti beberapa tahap di bawah ini.Pertama-tama tentunya anda harus memiliki Softwere Resetter tersebut,, untuk mendapatkannya anda bisa ambil di sini. Resetter Epson L110,L300,L350,L355
- Setelah softwere berada di tangan anda, silahkan anda extract terlebih dahulu, kemudian buka foldernya, lalu jalankan aplikasinya dengan Double Clik Pada Adjprogcracked.exe.
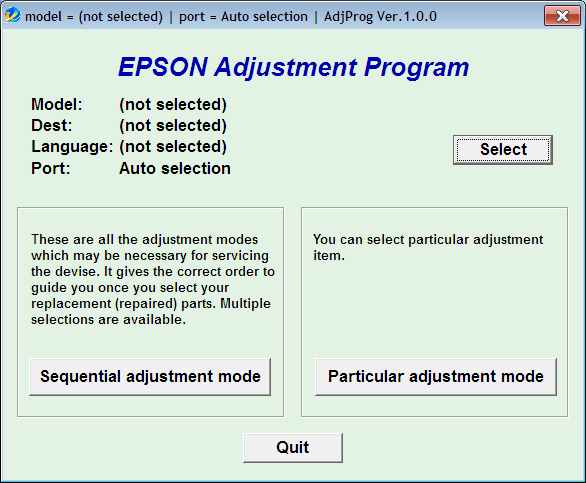
Aplikasi Aktif - Tahap selanjutnya Klik Select silahkan anda memilih Seri dari printer anda.
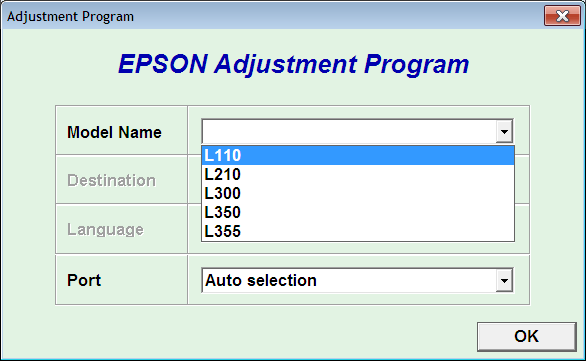
Pilih Seri Komputer Anda - Pilih pada bagian Particular Adjustment

Klik Particular Adjusment Mode - Selanjutnya pilih pada Waste Ink Pad Counter. Lalu klik Ok
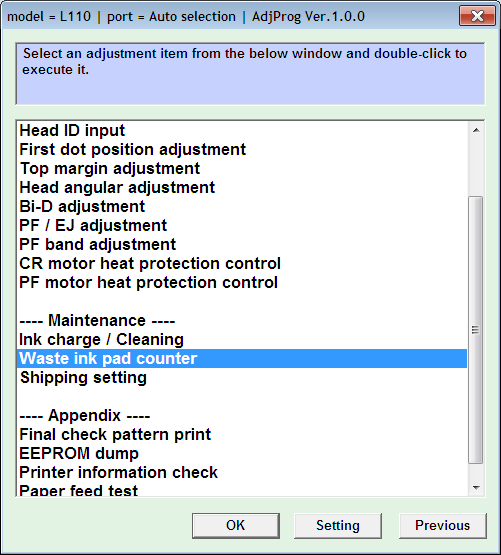
Pilih Waste Ink Pad Counter - Beri tanda Centang pada bagian Main Pad Counter. Klik Check - Initialization
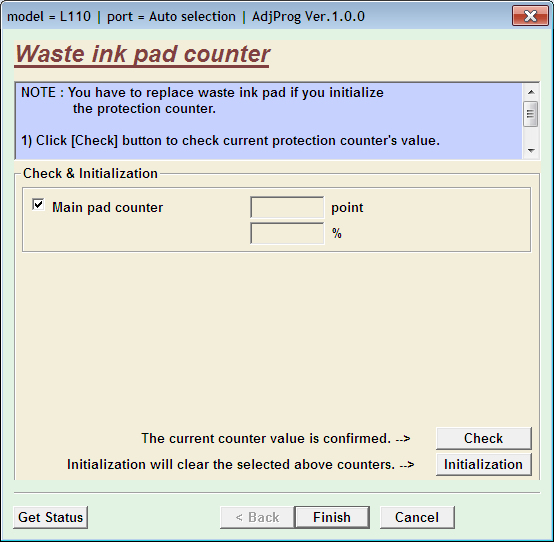
Beri tanda Centang, Lalu Check, Initialization - Klik Finish dan selesai
Go to link Download
Sunday, January 8, 2017
Cara Reset Printer Ip2770 waste ink full B200
Cara Reset Printer Ip2770 waste ink full B200
Masuk ke Service Mode iP2770 :
1. Printer dalam keadaan mati dan kabel listrik terpasang.
2. Tekan tombol RESUME 2 detik
kemudian tekan tombol POWER sampai lampu hijau nyala (saat menekan tombol POWER, ...tombol RESUME jgn dilepas dulu)
3. Kemudian lepas tombol RESUME, tapi jangan lepas tombol POWER.
4. Sambil tombol POWER masih tertekan, tekan tombol RESUME 6 kali. Led akan menyala bergantian orange hijau dengan nyala terakhir hijau. (jangan sampai keliru 4x karena printer akan mati total, tapi sifatnya sementara juga) Kemudian ...
5. Lepaskan kedua tombol bersamaan.
6. Led akan blink sebentar kemudian akan nyala HIJAU.
7. Komputer akan mendeteksi device baru, abaikan saja .....
8. Keadaan ini menunjukkan printer iP2770 dalam keadaan SERVICE MODE dan siap direset.
Kemudian jalankan Resetter iP2770 v1074 nya: download disini
hilangkan centang use our download manager.....klik download file
1. Exctract File Resetter iP2770.
2. Siapkan 2 kertas di printer (ini untuk print pada waktu proses reset).
3. Jalankan program Resetter iP2770
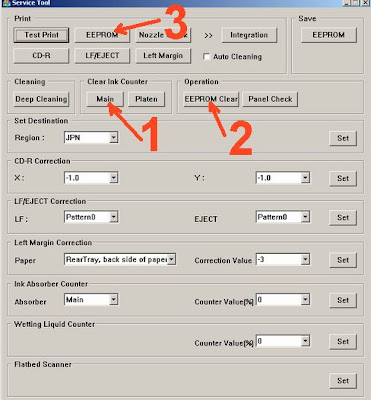
4. Klik "MAIN", maka printer akan berproses, kemudian iP2770 akan print satu halaman dengan tulisan " D=000.0 "

5. Klik " EEPROM Clear ".
6. Kemudian klik " EEPROM ", dan printer akan print hasil Resetter iP2770. Salah satu barisnya tulisannya sbb:
"TPAGE(TTL=00000)"

7. Matikan Printer dengan menekan tombol POWER.
8. Selesai...
astungkara berhasil
sumber :http://ekohasan.blogspot.com
Go to link Download
Thursday, December 29, 2016
Canon PIXMA MP780 Waste Ink Full
Canon PIXMA MP780 Waste Ink Full
1) With the printer power turned off, while pressing the Resume/Cancel button,
press and hold the Power button. (DO NOT release the buttons. The Power LED
lights in green to indicate that a function is selectable.)
2) While holding the Power button, release the Resume/Cancel button.
(DO NOT release the Power button.)
3) While holding the Power button, press the Resume/Cancel button 2 times,
and then release both the Power and Resume/Cancel buttons. (Each time the
Resume/Cancel button is pressed, the Alarm and Power LEDs light
alternately, Alarm in orange and Power in green, starting with Alarm LED.)
4) When the Power LED lights in green, press the Resume/Cancel button the specified
number of time(s) according to the function listed in the table below. (Each time
the Resume/Cancel button is pressed, the Alarm and
Power LEDs light alternately, Alarm in orange and Power in green, starting with
Alarm LED.) [hth: I believe the power button has to be pressed once more after
cycling the alarm button to complete the action. The power/resume-cancel button
LEDs toggle to help you count.]
Time(s) LED indication Function Remarks
0 times Green (Power) Power off When the print head is not installed,
the carriage returns and locks in the home position capped.
1 time Orange (Alarm) Service test print See 3-4. Verification Items,
(1) Service test print.
2 times Green (Power) EEPROM information print
See 3-4. Verification Items, (2) EEPROM information print.
3 times Orange (Alarm) EEPROM initialization [hth: does not re-initialize
Waste ink counter]
4 times Green (Power) Waste ink counter resetting
5 times Orange (Alarm) Destination settings [hth: not applicable]
6 times Green (Power) Print head deep cleaning (Cleaning of both black and color)
7-10 not applicable]
11 to 13 times Orange, Green, Orange (Alarm, Power, Alarm) Return to
the menu selection
14 not used in servicing
15 Orange (alarm) return to the menu selection,.
Note: If the Resume/Cancel button is pressed 16 or more times, the Alarm or Power LED lights steadily without
any changes.
[hth: if the alarm light is flashing 15 times at turn-on [cartridge not recognized error], none of these procedures seem to work. If anyone knows how to defeat this error, I would like to know.]
Go to link Download
Friday, November 4, 2016
Canon Smartbase MP700 Waste Tank Full
Canon Smartbase MP700 Waste Tank Full
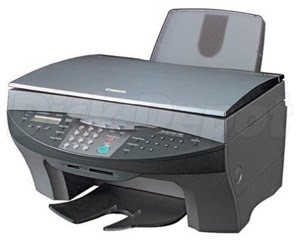
Resetting the Waste Ink Volume Counter
1) Enter SERVICE MODE.---
By pressing [Menu] then [Copy] then [#]
2) Select TEST MODE. (using + or - keys)
3) Press the [OK] key.
3) Press the [8] key. (TEST MODE)
4) Press the [3] key.
5) Press the [0] key. (INK COUNT).
6) Press the [OK] key.
7) Press the [Stop/Reset] key
9) Press the [ON/OFF]
------------------------Or-------------------------------
Open the cover printer, let the heads position themselves in the middle and then switch off the printer.
I then gently pushed the heads over to the left hand side. WIth a torch you can then see the ink tankson the RHS. It is two small padssitting within a black rubber surround. One is rectangular and the other is square. They are black and covered in ink.!! With small hands some delicate maneouvres and some patience you can just lift them (the pads -solid white blocks when washed) out with some tweezers or similar, wash them, dry them out and put them back. That is the easy way!
If you cant or if you drop one of them then the only other way i have found is a partial dismantling of the machine.Make sure you have the time and a clear head!
a)lift cover
b) remove pin from white bracket so lid tilts further back. The metal brackets will pop out.
c) remove plastic cover on rHS by removing two screws at front
d) remove screws retaining circuit board on Right hand side (be careful to reconnect any stray wires when it goes back together)
e) under the circuit board you find a screw retaining the top and the bottom of the printer together. Remove it.
f) on LHS with lid open you will also find a screw joining top and bottom as well as two screws at the back of printer (cant remember if you need to remove the plastic housing on the rear of the printer to find these screws??). Remove the two screw holding th top and bottom half together. Then the top half of the printer can be tilted back.Before you tilt it back Return circuit board to approximate position, metal brackets into slot, rejoin white hinge and close the lid ;Careful with wires.
g) then you have full access to teh printer waste ink tank. Remove pads, wash and reassemble!!
Good luck
Go to link Download
Subscribe to:
Posts (Atom)